Subaru six speed overhaul... how bad can it be?
Plenty of mystery surround the magical Subaru six speed… is it from this planet, who made it, but the biggest question is can I fix it in my house without a bevy of factory tools? The answer is… kinda? Let’s walk through what it takes to do this task and you can figure out whether its worth the time and effort at your home garage or this is one you should just farm out and rest easy when it is all fixed up.
After owning my Sti for 11+ years it was time to figure out what was wrong with my transmission, since the day I test drove it and purchased it I knew that fourth gear was not too happy to engage at higher speeds. And while adding a cocktail of fluids made it drivable I still would need to wait till the engine and transmission warmed up before quick shifting.
While my intentions are generally to help you get a grasp on how you can fix your vehicle this is one of those times where I can’t say this is a DIY/home garage fix. Can you purchase all the appropriate parts and do this at home.. Yes, you sure can. Would it be worth it? No. Please enjoy the below overhaul on the Subaru six speed but get an idea on just how much all these tools below cost and know that I listed a few of the parts/tools you need on amazon but this isn’t even half of the battle.

Ready for teardown. Here we go.
Time frame
It’s gonna be a long day.. and then another day… and likely another. The battle to remove this big behemoth of a transmission is the first step, so that is likely a half day expenditure of time. Then you have to fight off the grime and rust from it being underneath your car for however many years… Yeah this isn’t a quick fix and if you don’t have the specials service tools at your disposal, you should likely leave this to the professionals. I’d honestly say if you were very diligent you could maybe get it done in two days if you have all the parts, tools and service information ready to go. But a more realistic time frame might be a week for a first timer.
Tools
Your basic socket set and ratchet will allow you entry into the transmission but after that you will need a torx set, a pin removal set and plenty of special Subaru tools that aren’t exactly cheap. One of those special tools is a holder tool that keeps the shaft still while you break the highly torqued nuts off the end of the driven and drive gear shafts while a second special tool supports the other end of the shaft. Alongside those you need a press, plenty of special measuring and press tools are necessary for checking bearing clearances, shims and shift fork locations.
Parts
This all comes down to what you need to replace it could be as simple as replacing the dccd plates which can easily be done by just removing the extension housing and popping the ddcd out. But.. you could also need a a new gear set, synchros, possibly even a new front differential and that is going to add to your parts list. I will just list what I replaced and what I assume a majority of Subaru six speeds will need during a minor overhaul. That would be 3rd-4th gear, synchro hub and sleeve along with new needle bearings for the drive shaft, top those off with a new bearing and nut to finishing the job.

Iag has some carbon enhanced synchros, Just make sure if you buy these you get them for your transmission. There are small differences between the mounting tabs on the synchros and gears, IAG Performance 1st - 6th Carbon Synchro Set for Subaru STI 6-Speed 2004 - Early 2006 Transmission

IAG Performance 1st - 6th Carbon Synchro Set for Subaru Late 2006-07 STi, 07-09 Legacy GT Spec B 6-Speed Transmission
IAG Performance 1st - 6th Carbon Synchro Set for Subaru STi 2008-21 6-Speed Transmission
These carbon enhanced synchros are a tad bit more durable than their brass counterparts. Subaru used carbon enhanced synchros for a few years on 4th-5th-6th but then went back to brass after comments from customers of noise concerns coming from the carbon synchros.
Measurements
Before we start I want to inform you of the special tools and measurements that are necessary upon reassembly. While I have seen plenty of installation videos and how tos about this procedure I noted many of them did not perform any of these measurements. These are very important to life of your transmission and not causing more issues than you began with. So take note of this section before moving on.
There are many measurements for for this transmission but I am just going to focus on those pertaining to the gearsets. I assume plenty of readers will be viewing this to fix a gear that grinds when shifting with hopes that they can pull the gear set out and just pop a new one in. This can be done but you might very likely be missing the source of the issue if you don’t measure. Also this includes a special tool that is not likely in your tool box.
This tool is called a Mitutoyo dial height gauge and is used to measure the gear sets and find out the exact center to install the proper height shift rod for optimal engagement of both gears. It is also used to set the location on the main shaft and keeping the driven shaft in place.
There are plenty other measurements that can be done within this case without this tool but I won’t focus on those today,

Mitutoyo height gauge for making getting those shift forks in the right space and setting the gear sets up properly within the case,
Procedure
Please read through and make sure that you have all the appropriate tools before beginning this repair. If you think you might be able to get by without them, I would think again. There are a few repairs on this transmission that can be completed without special tools, but the majority cannot.
Well the first step is draining the fluid and then ripping that poor unsuspecting six speed out of your Subaru. Once it is out it's time to get busy. After removing the transmission my recommendation is to buy some large carriage bolts and nuts to place in the bolt holes of the bellhousing which will allow you to stand the transmission up while keeping the input shaft clear of being banged up on the floor. Positioning the transmission like this will be extremely helpful when you are removing the center case.

Carriage bolts holding the transmission make it so much easier to work and keeps the input shaft off the ground. Given how the gears come out this is the best way to work on this transmission.
With the transmission in place we can now begin by removing the shifter bracketry and shifter pin out to get those pieces out of the way for removal of the tail housing. If your car is older this is also a good time to spray some rust penetrant on the bolts and dowels. You are now ready to start extracting the bolts that hold the tail housing together. As stated above the dowel pin may make it difficult to remove so you can use a punch and drive them down to break the housing free. There is a layer of silicone holds the tail housing to the case and you may need to use a rubber mallet to break them free.

Let's start at the top.

Remove all these bolts and the tail housing is ready to come off.
After the tail housing is apart you will see plenty of components that make awd possible. You can start by removing the two split needle bearings that sit just above the dccd, these can easily get lost so make sure they are accounted for and organized to go back in their proper location. Next you can slide the transfer driver gear that powers the rear driveshaft, it slides right out. You can place it inside the tail housing for safe keeping.

First visuals when you remove the tail housing.

The needle bearings you see on the right side of the image above the dccd are the first things to remove, make sure you remember where these go. There is a another set lower in the dccd that we need to put back in it's home location.
Next on your list of tasks would be removing the dccd, you can start this off by removing the oil channel that holds the connector for the wiring harness to the dccd unit. After that connector is disconnected you can now slide the dccd out. There is another split set of needle bearings that live underneath the dccd, set those aside for reassembly.

This oiling trough also holds the dccd connector, you will need to remove it and you disconnect the dccd.

Output shaft can come on out.

Next up you can remove the Dccd and the second set of needle bearings that rest on the shaft.
Up next will be removing the support shifter linkage, their is a c-clip and washer that keeps it the set together, remove them. You may also find that your shift rod is in the lower postion, if so you can pull it right up to find the pin that holds it into the shaft. With the pin removed you can use a pair of pliers to pull it up and out of it’s location.

Shifting this skyward will allow to remove this parallel shift linkage.

In this image we have remove the spring clip that holds tension on the linkage, now we will drive the pin out.

All the pieces that will need to be removed before the shift linkage can be free,
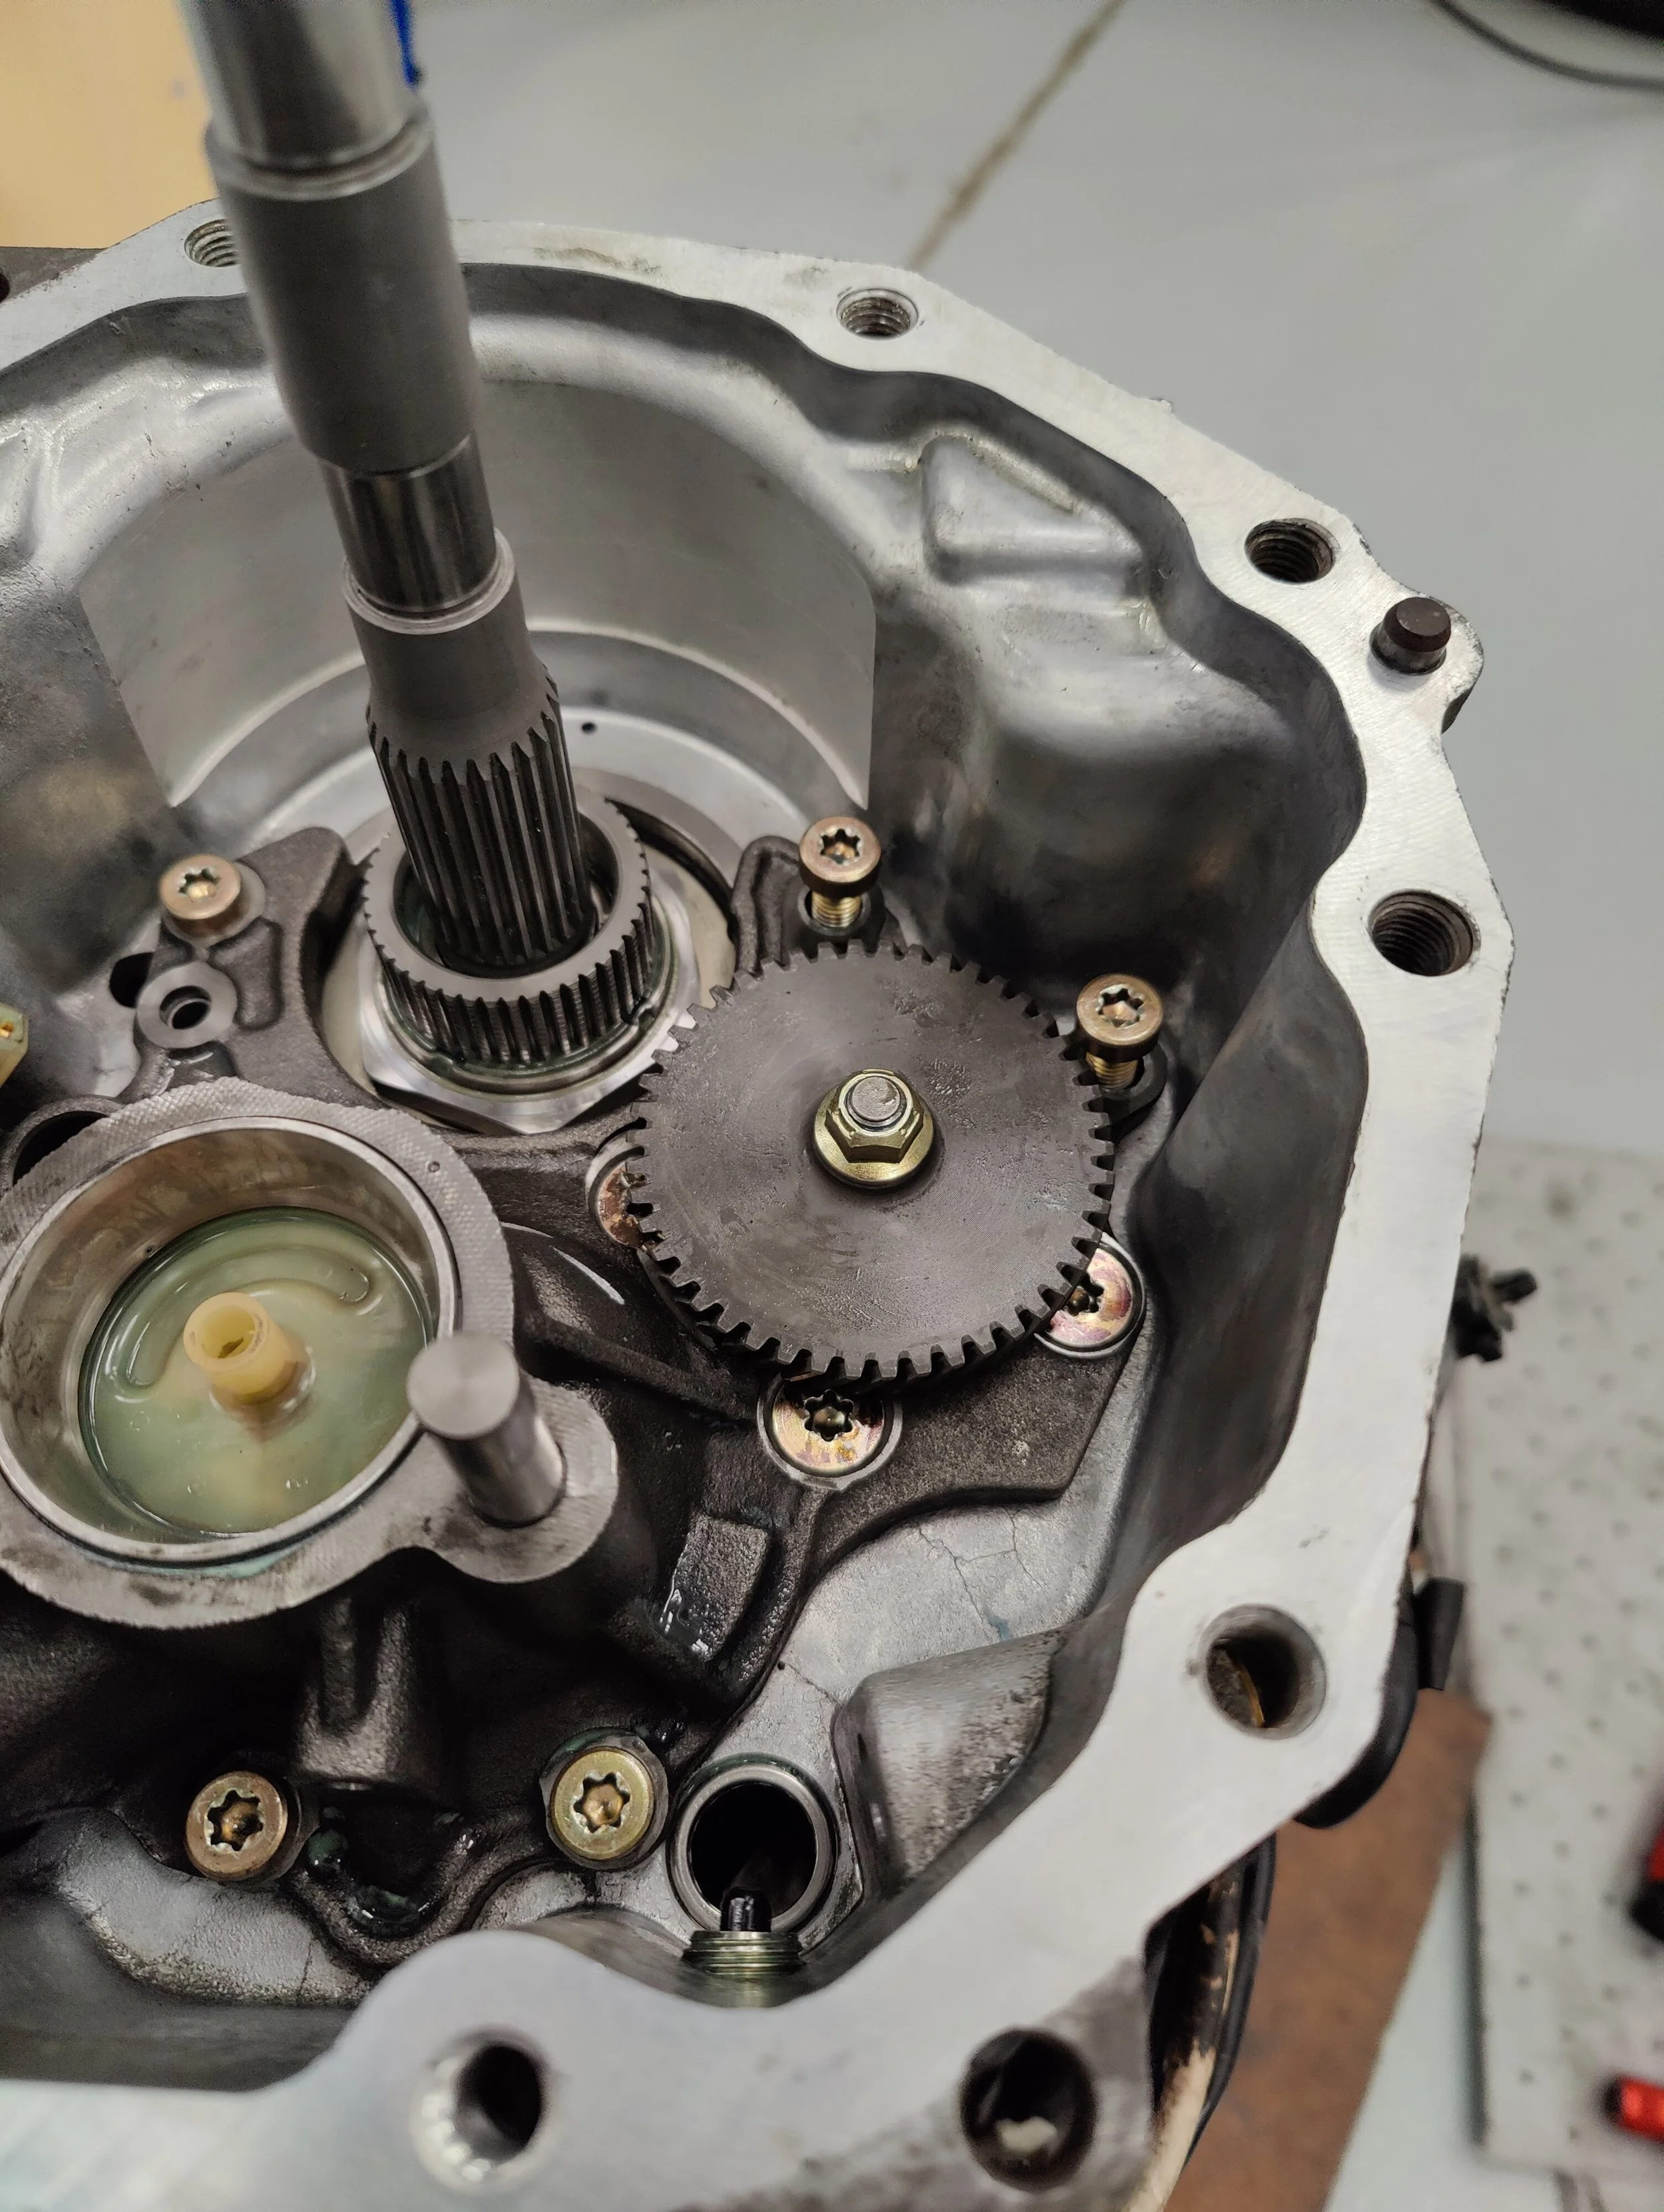
The next task is determined by the model of six speed you have, older 04-07 models will include an oil pump that is driven by dccd, looking into the case you will find this gear and two bolts located next to it. Once these two bolts are removed you can pull the gear and holder out.

If you are working on a 04-07 Sti transmission with an oil pump, removing the gear is next. the two bolts above the gear will allow you to remove it.

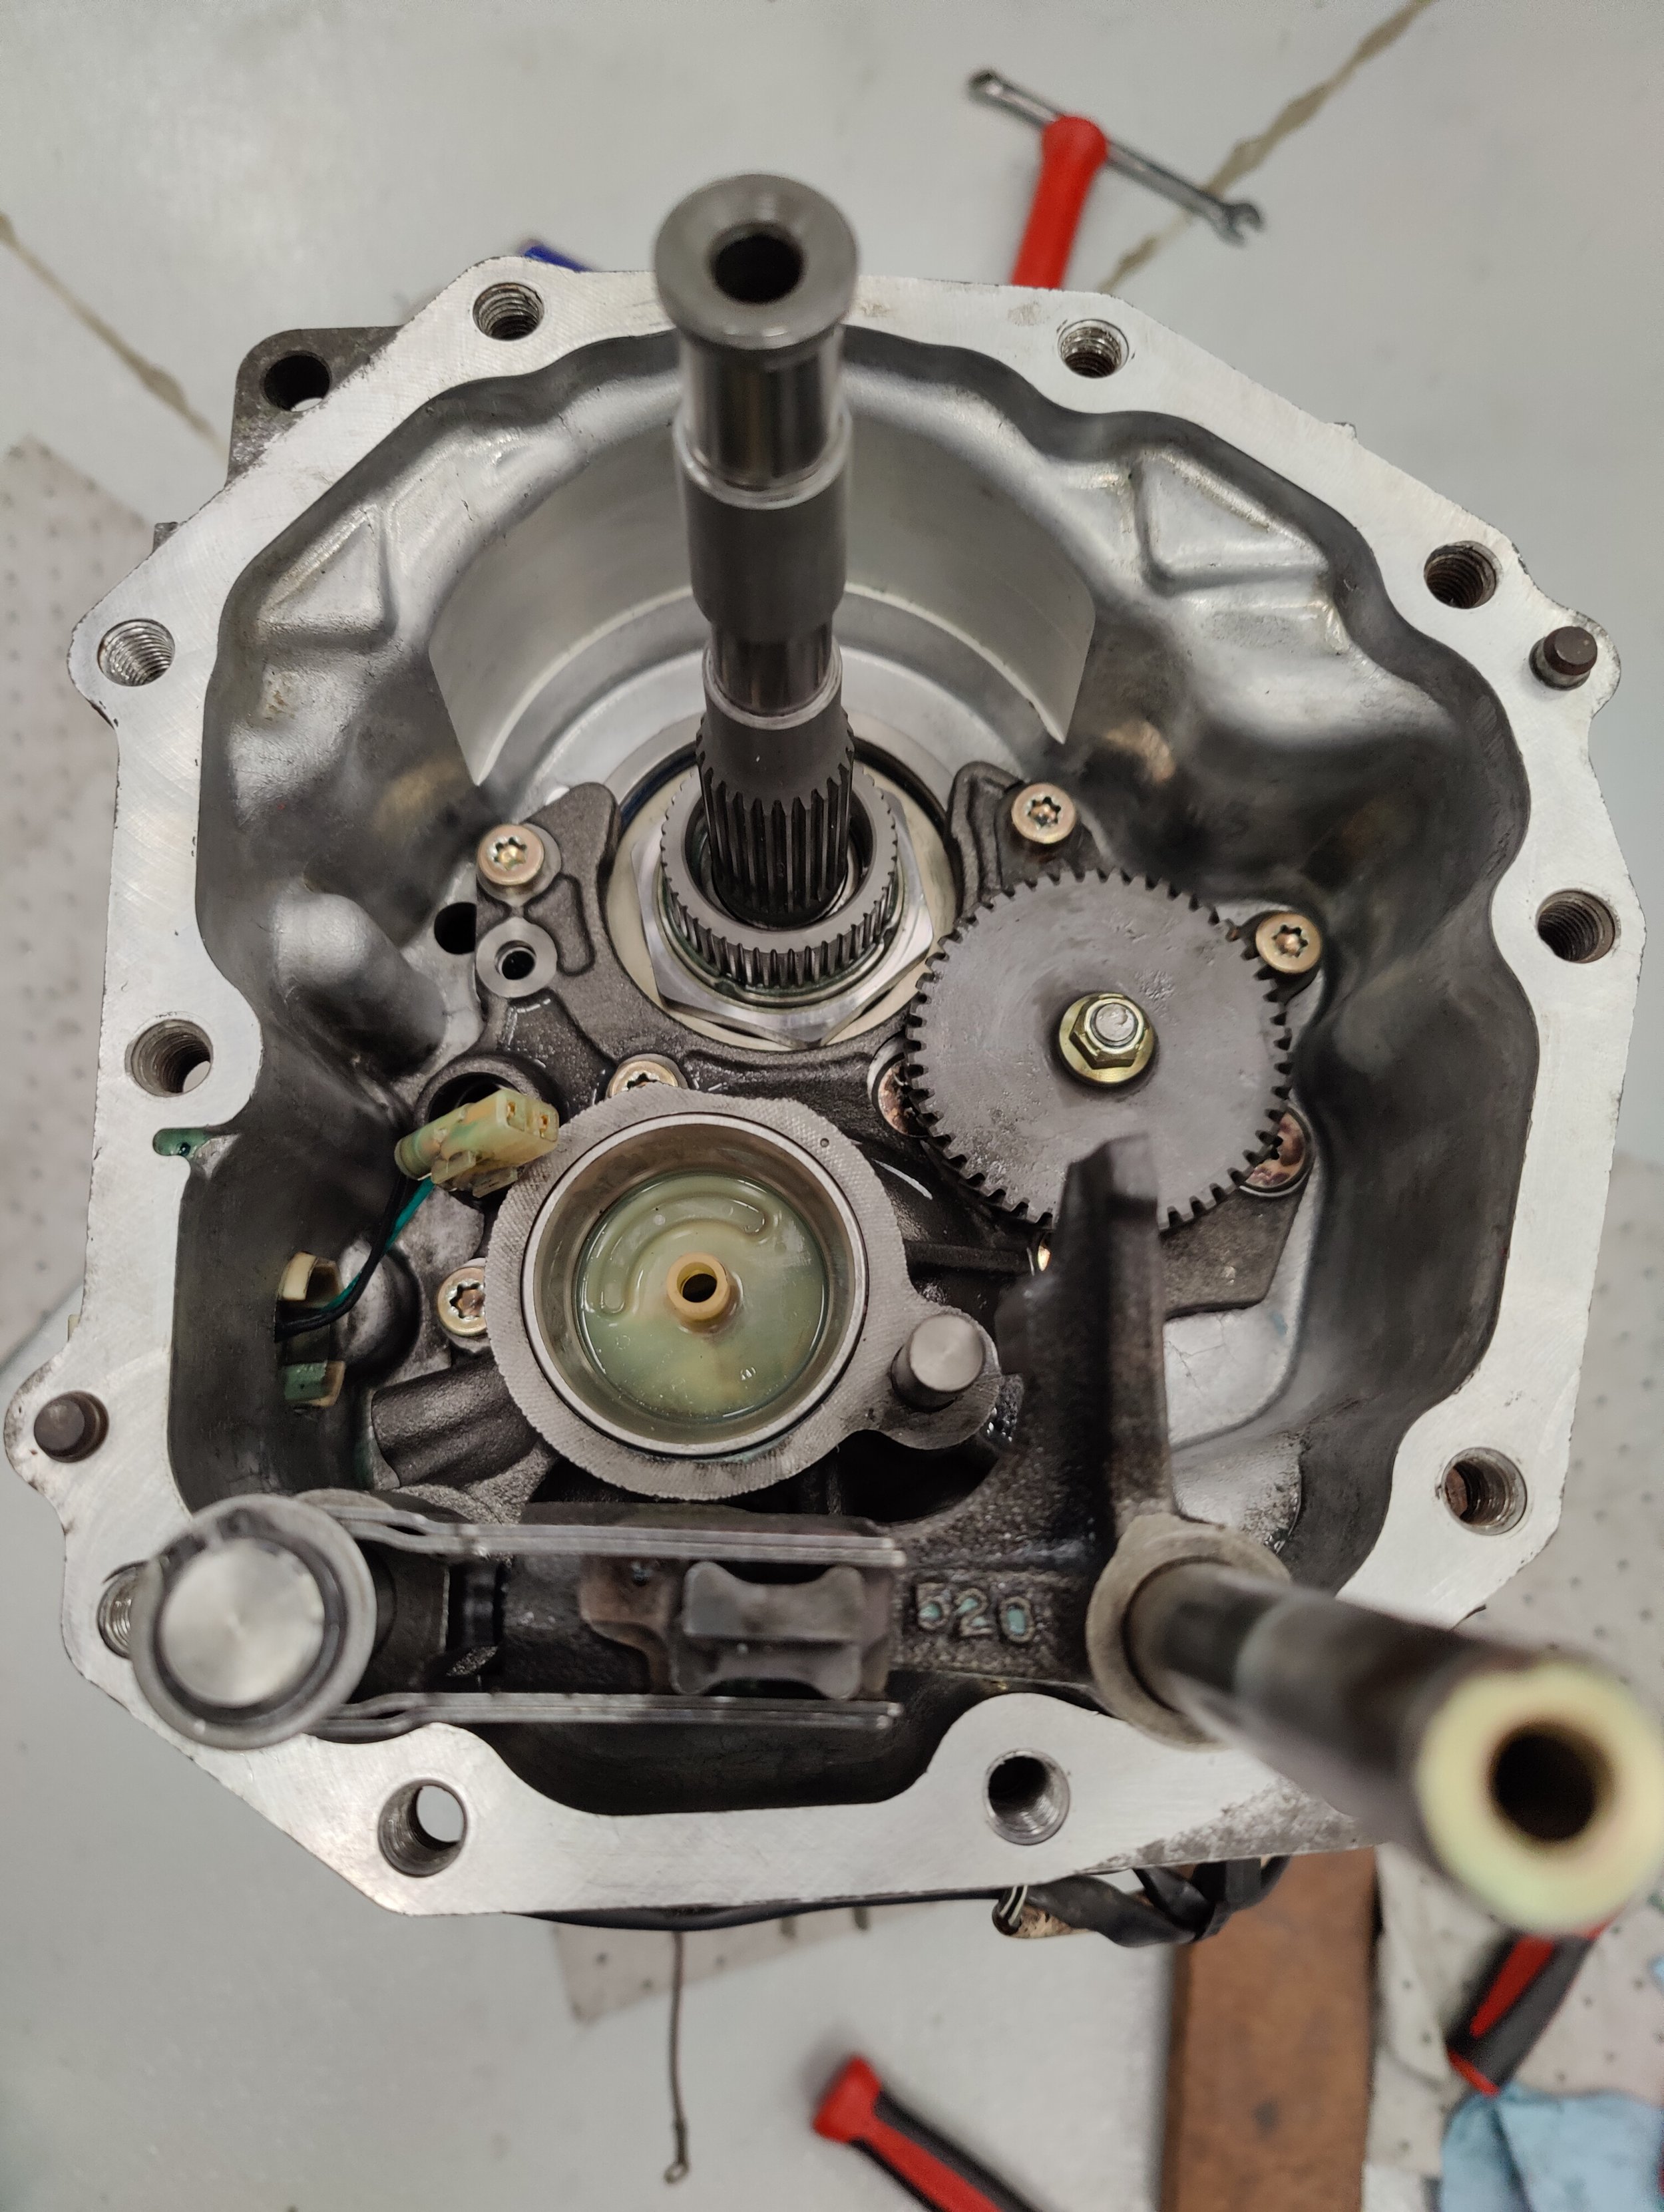
Oil pump driven gear and holder removed.
With the gear out you will see plenty of torx headed screws that hold on the end plate. This can be extremely difficult to remove, I recommend having a high quality torx bit and a power tool. Use a good amount of downforce on a power tool and this should help keep them from becoming damaged.

Next up the endplate is ready to come out. These bolts are not easy to remove after years of service. Have the appropriate tools on hand, if you strip these out you are going to have a really bad time.
You can now pull up on the endplate and slide it out. You will see the internal oil pump which can also be set aside.

End plate has been removed. Now we can see the oil pump gear and the tops of the shafts.

Oil pump components are ready to come out.

That leaves the c clip that holds the main gear shaft in place, I find this is best accomplished by use a pry bar to slightly lift up the shaft the comes out of the bellhousing. Now the c clip should be easy to remove. There should be a selectable size washer here, make sure you keep it with the c clip they are very important.

Next up the main shaft adjustment shim lives on top of this bearing and you will need to remove the c-clip that holds the shaft in.

These are both precision measured pieces, if you don't measure the proper components you can shorten the life of your transmission or cause shifting/engagement issues alongside increased wear.

Above the driven shaft lives a collar and shim(s) to make remove of the case easier we will remove these. Once again these are precision measured piece that can wreak plenty of havoc inside your transmission if they are not replaced with the right units.

Collar and shim removed.
This completes the removal process for the top portion of the main case. You can now remove the exterior wiring harness and oil pipe for applicable models. Completing these steps readies you for the main case removal, the last few bolts are on the side of the case which are the reverse idler bolt and the two pilot bolts. Then you can start removing the bolts that hold the main case to the transmission plate and front differential housing, also note there are three nuts on the underside of the transmission too.

If you have an oil pump, you can now remove the oiling hard lines and set them aside.

Two pilot bolts sit in these two spots which maintain the positions for for the interlock and shifting mechanism. To remove the case they need to be removed.

Pilot bolts removed.

Around the side of the trans from the pilot holes is the reverse idler bolt. It also has to come off to remove the transmission case.

Reverse idler bolt joins the pilot bolts.

Now we we need to remove all the bolts that mount the mid case to the plate.

There are three studs that live on the underside, don't forget them. Also if they are rusty they might not want to come out without a fight.
You may find difficulties when removing the case, I would gives the dowels a bit of penetrating spray. It may also find it necessary to use a punch to drive them lower to help release the case. I will advise on hitting these too hard as it can mushroom the dowels making your life not so fun when going back together.. ask me how I know. There are a few points you can pry on but be careful to keep any prying tools from damaging the sealing surfaces.

Removing this case can be tough, there are very few points where you can pry, This recess here is one. Otherwise using a soft rubber mallet and trying to tap it free is another option.
Having the case removed you will see the gearset in all its glory. You will want to locate the shift interlock system and slide them out of engagement and you can now remove the entire shift rod. Next we will pull the third/fourth gear shift fork up into fourth. this allows us just enough room to remove to slide the reverse idler holder up and out.

With the case removed this is what you now find.
Up next on the list is removing the detents that hold the shift rails for 1-2 3-4 5-6 and reverse in place. These are held in by a bolt and within that you will find a spring, detent plunger and ball. Using a small magnet tool you can slide all these pieces out. Having this step completed gets you ready for removing the shift rails… which is a little more than just pulling them out. Now show you will also need to remove the reverse idler up top of the reverse gear shaft. It is removed by placing the transmission in fourth gear and sliding it on and out.

Removal of your shift rail detents will be up next.

On the right the reverse shaft holder bolt has been removed, now you need to remove the shift rail detent next to it.
There are a few ways to accomplish removal of the gear sets and shift rails. One method needs two people and a ratchet strap, first you will put the strap around the gear sets to help the first person pull them up and out while also removing the shift rails. The second person will hold the front differential housing down with one foot and while the first person starts to pull the gear sets up they will remove the reverse shift rail and gear set. The reverse gear set is meshed in with other gear sets so the main gear sets will need to be lifted about four inches above the gear plate and then the reverse gear set can pulled away and out.

The shift rails are now primed for removal.

This image shows how the shift selectors and lock outs before you attempt to remove basically everything. They linkage should be resting on the plate in a position like this before you attempt the removal of the gears and shift rails.
Another way this can be down is by lifting up the gear sets with a prybar and then setting a 2x4 under the gear sets, this will allow you to slide out the reverse gear, rail and all the shift rails for 1st-6th. This method can be pulled off by one person and with two people can be a much easier less brute force way.

In this image we see the 2x4 being used to support the gear sets when removing them from the transmission plate, Reverse is shown in the plate but this was set back down after pulling the gears up and out. Use of this 2x4 can save your back and allow a stopping point to remove the shift rails/forks prior to pulling the gear stacks completely out.

Here we see the shift rails can easily be removed so that you can concentrate your efforts on the gear sets, Reverse once again won't be in this position it was just resting here,

Now you can pull the main and driven shafts on out of the transmission and be ready to start your teardown.
Determined by what issues you have you can go ahead and start breaking down the gear sets. These both have high torque and the service manual will give you special tools to break the lock nuts free to get to the gears.

Specialty tools for removing the not off of the main shaft.
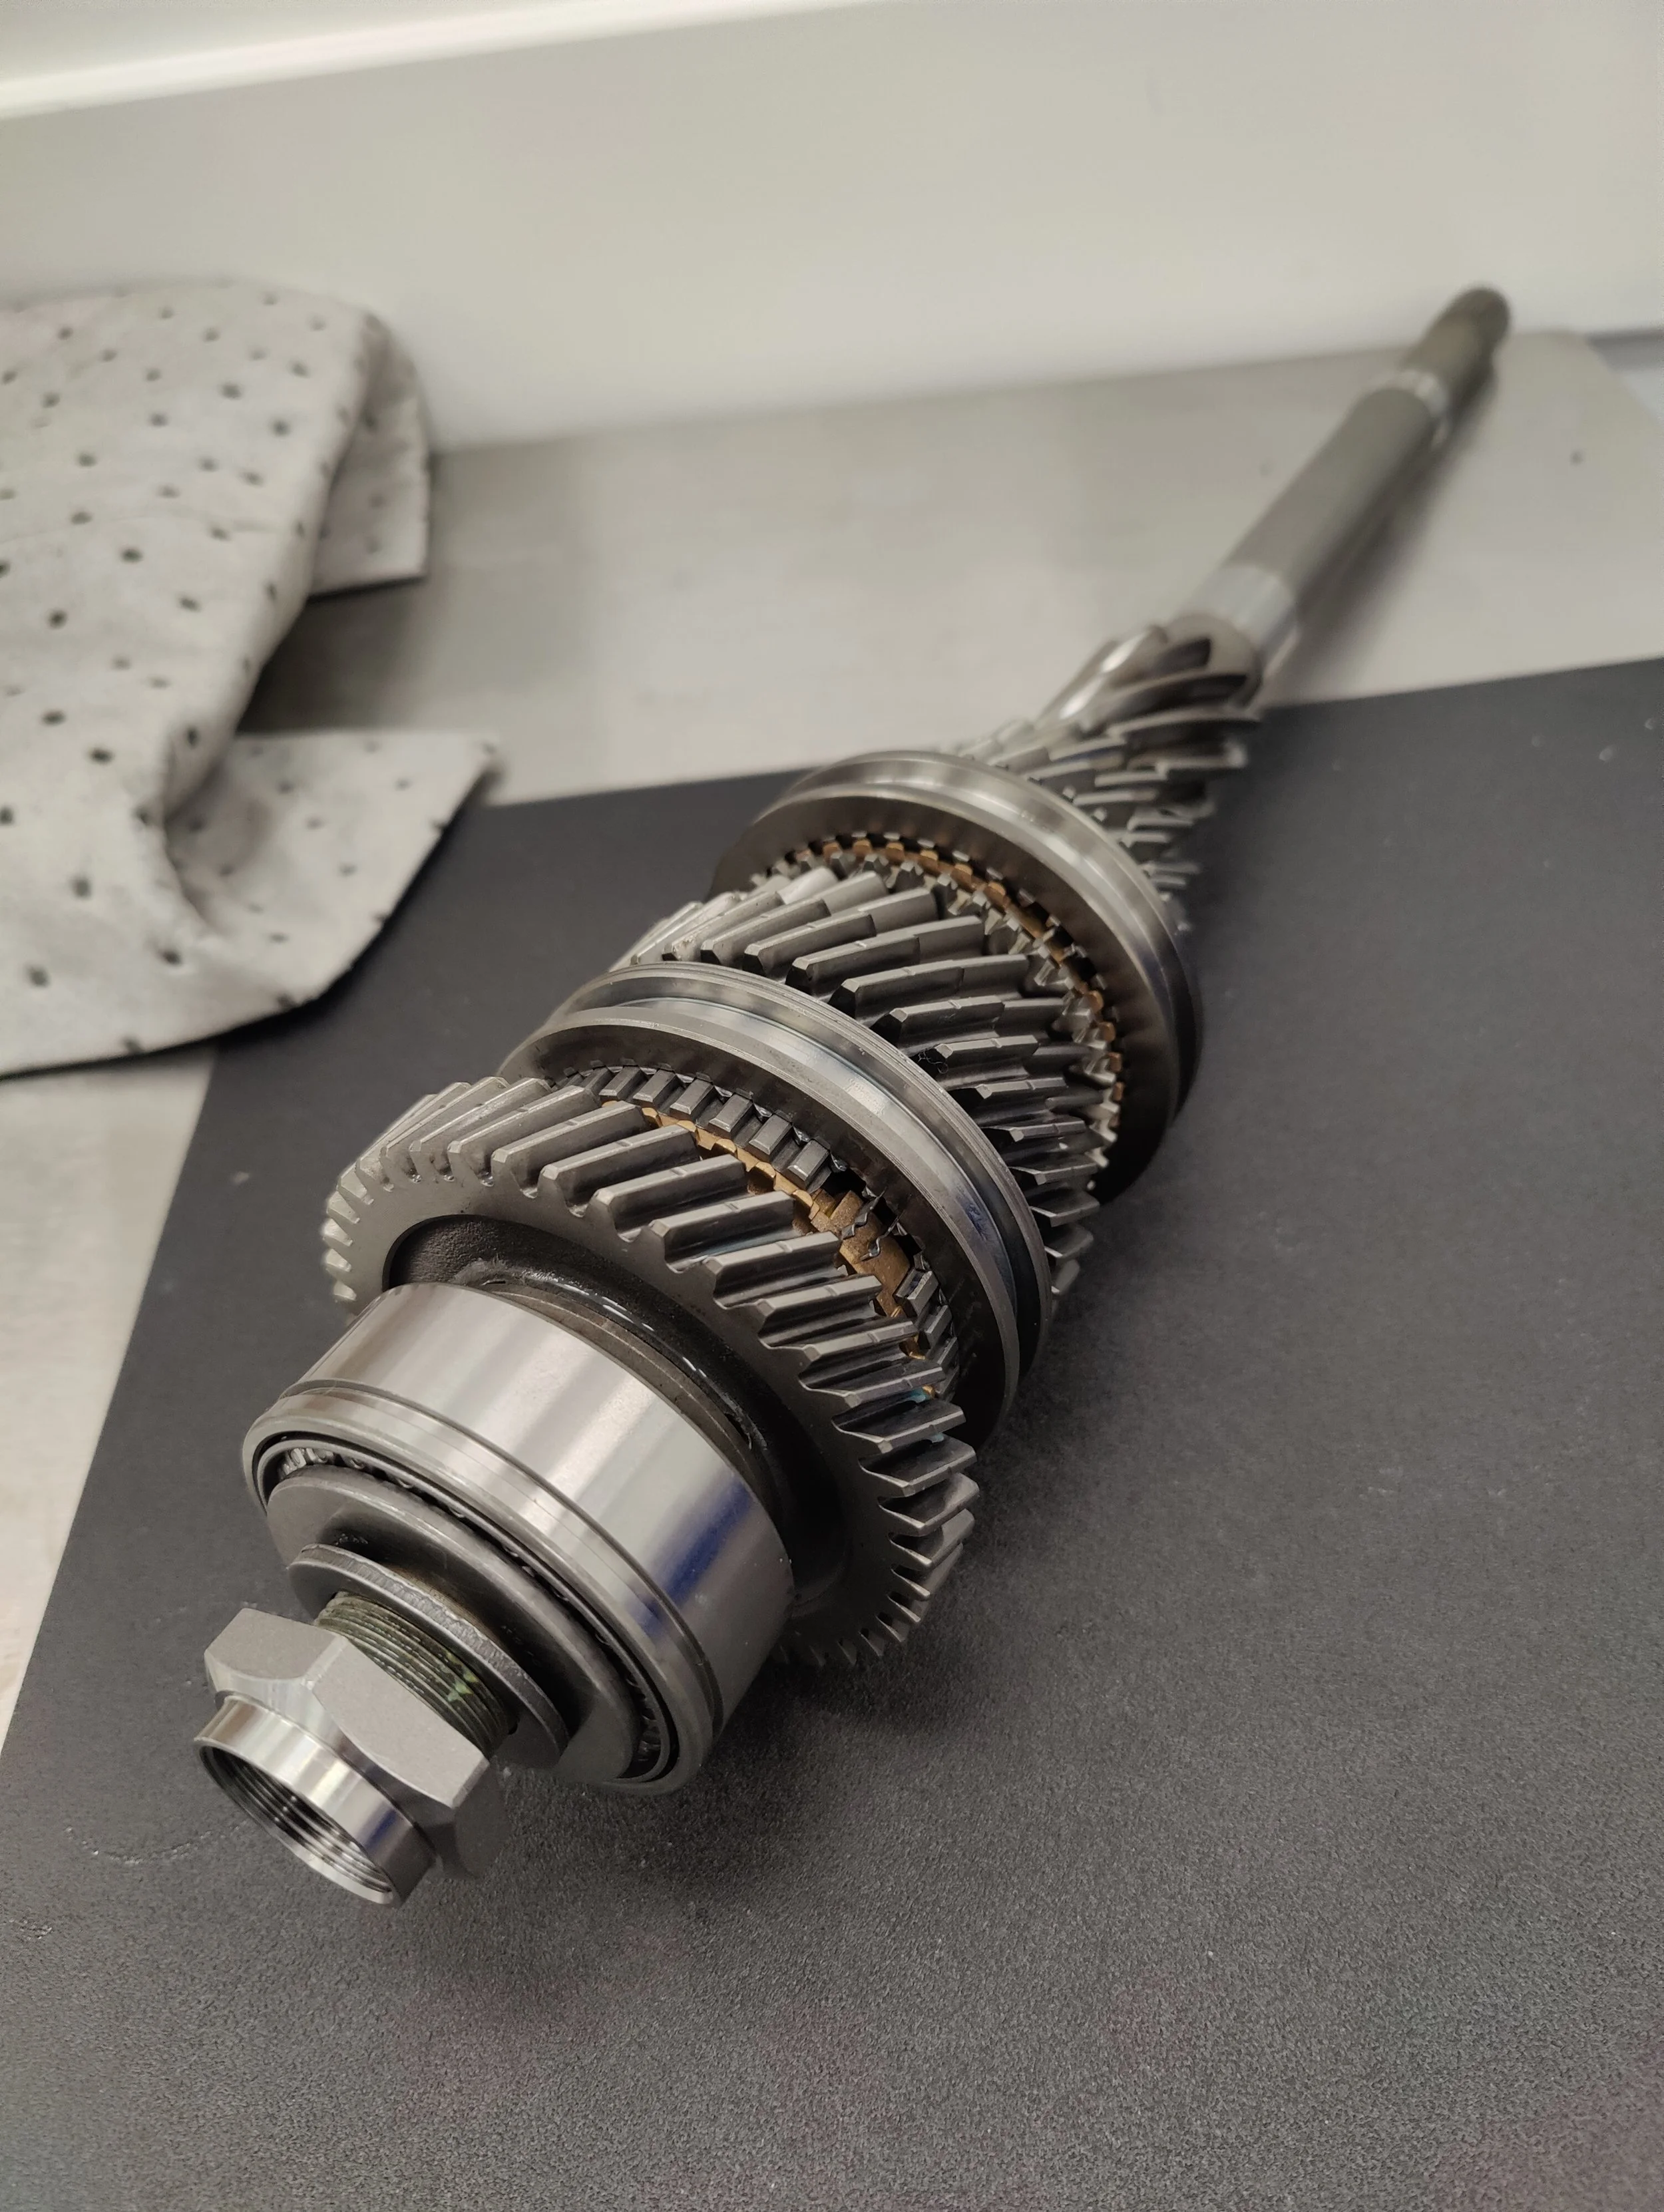
Ready for tear down.
I personally have found that the most likely area for damage is within the main shaft, the main shaft includes the input shaft, the first and second gears will be part of the shaft and past them you will see third through sixth gears. I have witnessed many failures on the 3-4 shift fork, there are two portions of nylon on the shift fork and it is very common to find them missing when your car has trouble shifting into third or fourth. Overtime this will worn down piece of nylon will cause wear on both the synchro slider and synchros, so be ready to order these parts.

Here is the reason for the teardown, this nylon insert on the 3-4 shift fork is a more common failure point. This causes noise and harsh engagement when going into both of these gears.
The third through sixth gears are pressed on and can be removed. With the nut off you can remove sixth gear and the upper bearing, the factory manual states the need for specialty tools but I have done this with a generic press adapter. The final press will be to remove the remaining third through firth gears and synchro hubs, it may seem crazy but this is precisely how it’s down. Make sure you keep your parts in order as the synchro sliders have a certain rotation and should be placed back in this location. Unlike removing the gears the shaft goes back together with one gear at a time, it would be my recommendation to replace all the needles bearings along with the upper bearing when going back together. Don’t forger to index your oil drilled gear bushings, they will need to be offset in these years, the oiling holes should be 30 degrees offset from the shaft hole.

Sixth gear is the first to be removed and the bearing will come with it.

Per Subaru factory service manual procedures the next step is pulling all the rest of the gears off by placing your press tool under third gear.
Now with the gear sets off you can replace what pieces are damaged, broken, worn down, etc.. Pressing them back together is a much slower process with you placing one item on a time in a specific order and maintaining proper orientation of the parts. I will likely add this section later.
The next part is where having the special tools will make these much much easier. You will use a a couple of special tools to hold the shaft still while maintaining it horizontal plane. This nut will torque to 289 foot pounds. You will likely need a special torque wrench for this part as most generic torque wrenches don’t hit this high.

You can now turn your attention to the driven shaft. I found during my teardown that everything was well within specification and I didn’t need to replace or remove anything. I the large three piece synchronizers on the first and second gear are very robust and can take a bit of abuse. But if you find yourself taking this apart you will need to follow a few directions Subaru specialty tools are very helpful for removing the nut that holds this gearset together, especially since this is torqued to 391 foot pounds.

You will need your special tools to break this nut off, it is torqued to 390 foot pounds.
If you are pressing this driven shaft apart the first place you will start with is under the third gear, you will be removing the upper bearing and third through sixth on this press. Now you will find two woodruff keys that will need to be removed to get the rest of gears off. Second gear will come off by hand you will be left with reverse and first on your driven shaft. Once again a very special tool is needed to remove first gear, a special press tool barely squeezes over the reverse gear and just catches the teeth of first gear. I would not recommend this jobs be done without this tool, serious damage to your gear set or yourself is likely to occur without the special tool. You can now inspect all of the gears, hubs, synchros, etc for wear and replace as necessary.

You don't have to take it slow, but removing the -fixed 5-6th gear plus the bearing can be your first push.

Next will be the 3rd and 4th fixed gears. Then you will need to drive off the keyways that hold that help keep the gears from rotating.

If you need to tear this shaft completely down you are going to need this very special tool to get first gear off.

In this image you can tell just how similarly sized reverse and first gear are.

This tool has been made for doing this one job, while it might not look like it will work, it does.
When going back together you will follow the disassembly process by adding a gear at a time. First gear will start the party followed by its synchros, then the synchro hub making sure it is installed the same way it came off. Then you will need to press on the second gear hub sleeve on the 2005 model with the stepped side will go up. This is a place where a specialty installer tool will make your life just a bit easier. Next you will place the second gear bushing making sure the oiling holes are not aligned, we need oil pressure to keep these gears happy. The first and second gear slider should now be installed in it’s original direction and then you can follow it up with second gear synchros and the second gear. Next take your lower woodruff key and place it back on the shaft then you are ready to line up third/fourth gears and press them on. Hammer the upper woodruff key back in place and now you are ready to install fifth/sixth gear set. With all the gears installed you can install a new upper bearing and get ready to install a new lock nut at 391 foot pounds. There are four locations where this nut needs to be staked, be careful not to overdo it and crack the nut,
At this time if you have the proper tools to perform the measurements you would want to do so. I spoke about measurements up top as a warning to those trying to this at home, these measurements are done to not only make sure of proper operation but also for the longevity of your transmission parts. Whenever you add or press a part on a shaft these measurements make sure it all lines up in the case for proper gear engagement, gear selection and the proper clearances for bearings.

When changing out any gears you will need to take out your trusty Mitutoyo to make some measurements to have all your shift forks properly centered on the gear sets, For both longevity and proper gear engagement. These are very important measurements.


This is starting measurement you will make when finding out which shift rail will work with your 3-4 and 5-6 stack heights,

Making a measurement for the main shaft snap wring and washer,

Rails for the Stil full case transmission have lines to indicate what height they will hold the shift fork at for that gear set. Determined by your measurements you might need to change a rail out after replacing gears.
A few quick tips before going back together, even if you didn’t remove the base plate that sits on the differential housing to repair anything inside you will want to sperate it and reseal it with the proper Fuji bond. This is also the time in which if you wanted to replace any of the oil seals you can do so. If you wanted to replace the input shaft oil seal now is the time as it isn’t easy with the input shaft installed in the care. The same is true with the shift rail that pops out of the tail housing, this is the best time to replace it.

Resealing the front housing to the plate prior to reassembly.
Another tip is cleaning out the magnet that rests in the lower oil pan collecting pieces of worn out gears. If you have had synchro issues, this is probably going to be pretty well covered.

If you have had some wear in the transmission make sure to clean out your magnet before going back together,
If you were overhauling your transmission you would now have all the gear shafts and shift rails assembled to put the transmission. If you are doing this as a solo individual it is best to utilize a a 2x4 to help rest the gear sets to make it bit easier on yourself. As the both gearsets, reverse, and all the shift linkage needs to be installed all at the same time. I am sure it is possible to complete this as one person but I think you would be better off saving your body by using this method.

Mocking it all up. Be aware that I had reverse there but this is not how it will go in. It needs to be engaged with the gear teeth in order to be installed. But this is how you can hold up the gears and get the shift rails in place.

Next up we add the shift forks and rails to the party. It is almost time to installed it.

Everything i back home where it belongs.
After you have struggled to get all the gears, shift forks etc.. aligned it is time for the best part of all. To lay down a bead of silicone and attempt to drop the transmission case back, which sounds like it could be pretty simple after all the other work you have completed.. but it is not. To complete the case installation you will need all the gears to be in their neutral position, if they aren’t you will not be able to put in the pilot bolts and finish the job. It is extremely easy to accidently knock a rail out of neutral and then have to start the process all over again.


This is where you shift linkage and block outs should be, this is neutral. The openings on the lockouts are where the pilot bolts hold up the lock outs and keep the linkage from falling.
My tricks for this are installing a screw/bolt into the shift detent hole and sticking it in fourth gear which should lock out the rest of the gears from moving. Then once the case is on you will want to put in the lower pilot bolt, once it is installed you may push the shift linkage back down and place it in neutral. Then follow the next up with the next pilot bolt. This is a crucial step as if you forget to put the pilots bolts in your shift lockouts can slide out of place and you won’t be able to shift the vehicle. There are plenty of other tricky ways to do this, I will add others if they are others asking for them.
Once the case is on you can install all the shift detents for reverse along with the forward gears, next up you can install both the reverse idler bolts and reverse shaft bolt. Now you can head back up to the top of the case.

The case is now installed and we can keep this party moving.
If you have changed the height of the driven shaft you would need to measure those to install the proper parts. Then you can install the collar and shim(s). Next up is the main shaft snap ring and shim, the oil pump, and then you can install the end plate above the shafts. If you have an oil pump the oil pump gear can now be installed. The Dccd can go back home on the top of the driven shaft now and you can plug it back in. You will want to install the parallel shift linkage that spans the width of the transmission. Finally it is time to add your transfer driven gear and shaft.

The collar and shims can be added back on top of the driven gear set. Shims go below the collar.

Collar and shims fittted and ready for the endplate to hold them down.

The c clip and washer need to join the top of the main shaft before the endplate goes on. These two pieces hold the main shaft in place in the case.

Endplate is installed. Don't forget your oil pump gear like I almost did, I had to remove those lower bolts.

Oil pump gear is ready to go in,
Oil pump is back home and happy,
Next up the parallel linkage is installed. Adding the washer, c- clip and pin that hold it tightly in.

The split needle washers found their home inside the Dccd before the Dccd went on. I would recommend a dab of grease to hold them tightly to the shaft. The second set of split needle bearings will be installed in the polished surface above the Dccd,
Nothing else left but to add you bead of silicone and install the tail housing. Take note that the loop on the Dccd most be placed in extension housing for it to work properly and for the extesion to go on. This can be moderately difficult as you are trying to spline up the dccd and transfer drive gear shaft splines, and also engage the transfer driven gear and drive gear teeth. I find spinning the output shaft helps everything find its happy place and then you can go ahead a bolt it all back on.

Nothing else left to do but to throw it back into the car with my fingers crossed. Ok, not really. I felt really good about the fact that everything was done correctly.
And just like that it should be a transmission again. You can use a screwdriver or set of shifter to test for proper operation before dumping it back into the car.
Amazon links
IAG Performance 1st - 6th Carbon Synchro Set for Subaru STI 6-Speed 2004 - Early 2006 Transmission
IAG Performance 1st - 6th Carbon Synchro Set for Subaru Late 2006-07 STi, 07-09 Legacy GT Spec B 6-Speed Transmission
IAG Performance 1st - 6th Carbon Synchro Set for Subaru STi 2008-21 6-Speed Transmission
Mitutoyo 570-313, HDS Digimatic Height Gage, 18" X .0005"/0.01mm, With Output
Subaru 75W90 Extra S Gear & Transmission Fluid - 5 Quart Bottles Sti WRX Genuine SOA427V1700 X5
Subaru Genuine 26.3 x 32.3 x 1 Gasket - 803926090
60 Tooth 3/4'' inch drive 100-400 ft lb/136-542N.M Torque Wrench
Genuine OEM 2007-2018 For Subaru WRX STI Manual Transmission Main 3rd Drive Gear